


How to make an animation
I went back and forth on if I was qualified enough to write about this but then said, screw it. I can a least let people know how I make my bootleg animations because maybe this would help them too!
Animations have won my heart and are a bit tricky but like all things, they become easier the more often you do it.
First off – the only three program that I currently use for my animations are: Illustrator, Procreate and oddly enough, Canva.
Now, I have goals of upping my game and pivoting to After Effects, like all the cool kids, but I’m just not there yet and that’s okay.
So let’s break it down.
There are two types of animations that I’ve figured out. One being stop-motion which I use illustrator for. With this, I create about 30-40 artboards all sized at 1080px by 1920px for reels. Then, I copy the object that I want to be animated and paste it on the next artboard. When I do this, I use paste in place under edit. This insures that the object is in the exact same place that it was in when it was on the first artboard. I then move it as much as it makes sense on the second artboard and copy that same object and click, paste in place to move it to the next artboard. I do this over and over and sometimes I will move two objects, add pieces onto the object or add in other objects. The key is to start every new artboard with paste in place from the previous artboard so your motion does not skip when it’s assembled.
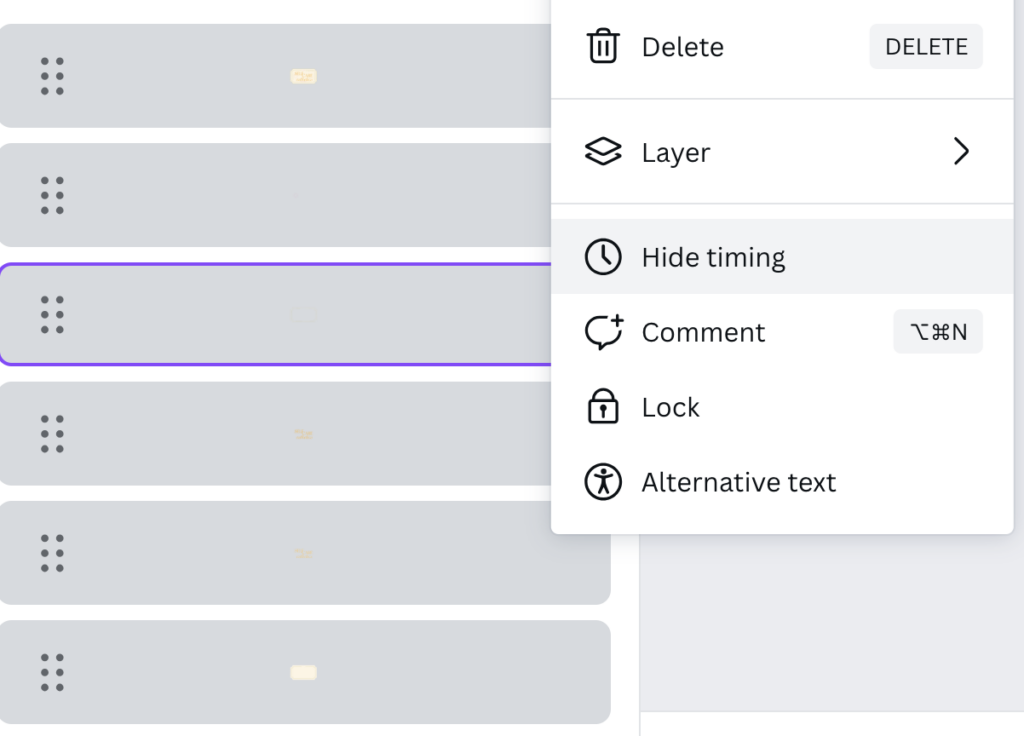
When I export the files, I make sure that it’s set to export artboards and then I assemble the reel in Canva under Create A Design, Reel.
Canva has the option to show the timing of the frames and has a position panel. The show timing option is vital and the only way to build your reel is it has multiple moving parts. The position panel acts like the layers panel in Illustrator. You could export your pngs with a background or keep it transparent and use a video from one of their stock videos.
For animations created in Procreate, I set my board to 1080px by 1920px and use their animation tool under the canvas bar.
You click over to “animation assists” and version of animation allows you to create a more fluid look for things like drawing and typing. Here, you use your eraser tool and slowly dissemble your image. You want to start where you want the animation to end. I try to think about what kind of image would work best for this ahead of time and am sure to only export that portion. It is easiest to do this with something that does not have a background.
The best way to describe how this works would be to think about knitting. You use your eraser tool, erase a small amount then click your frame along the bottom. There, you click duplicate.
This is where the knitting comes in, when you duplicate the frame it will always show up before the one you were working on. In order to keep things on the right track you then need to click on this new frame before erasing some more.
I’ll link a video here for you to be able to see what I’m talking about. I do recommend bringing your onion layers and transparency all the way down. I learned this the hard way after working on an animation for a while with my pen tool instead of the eraser tool. I also would recommend working with the background on transparent so that you are able to see everything. If you forget to erase something in a frame and have moved on, you have to go back to every frame where it’s still there to erase it. There are loads of YouTube videos on this and I know that personally, I have a lot to learn but am excited to be getting into it.
The hardest part about both of these versions is the assembly. The Procreate version with the gif is harder to work with than the Illustrator stop-motion frames.
To have the animation be transparent and on loop, it has to be exported as a gif. This is fine if it is only one piece but if you want to add other layers to it you have to time out how long the gif is for one loop. This is because when it’s uploaded into Canva, it will keep looping and doesn’t start from the top every time you play the video. It will start from the top once it’s exported which is great but making sure that everything lines up can take some patience. For most of my reels, I do end up exporting it about 3-5 times to get the frames to line up before it’s perfect so don’t feel discouraged.
if you have any questions – feel free to reach out! I hope this helps and let me know if you end up creating your own animation 🙂
Designed between the mountains and rivers of Missoula, Montana.
Every business has a story, have your branding tell yours.
follow along @alpinelupine_
hello@alpinelupine.com
credits
